Aggregation
The aggregations framework helps provide aggregated data based on a search query. It is based on simple building blocks called aggregations, that can be composed in order to build complex summaries of the data.
집계 프레임 워크는 검색 쿼리를 기반으로 집계 된 데이터를 제공합니다. 이는 복잡한 데이터 요약을 작성하기 위해 구성 할 수있는 집계라는 간단한 빌딩 블록을 기반으로합니다.
Elastic Search의 Aggregation이라는 컨셉에 대한 내용이며, 정리하여 Elastic Search의 Document안에서 조합을 통해 어떤 값을 도출하는 것이다.
좀더 자세히 보면, 데이터를 그룹화하고 통계치를 얻는 기능으로, SQL GROUP BY 및 SQL Aggregation 기능과 비슷하다고 보면 이해하기 쉽다.
ES에서는 하나의 응답에서 검색 적중을 반환하는 검색을 실행함과 동시에 그와는 별도로 집계 결과를 반환할 수 있다.
즉 간결한 API를 통해 쿼리와 여러 집계를 실행하고 두 작업(혹은 둘 중 하나)의 결과를 한꺼번에 얻어 네트워크 왕복을 피할 수 있어 강력하고 효율적이다.
[출처 : https://www.elastic.co/guide/kr/elasticsearch/reference/current/gs-executing-aggregations.html]
Aggregation의 포맷은 다음과 같다.
"aggregations" : {
	"<aggregation_name>" : {
    	"aggregation_type>" : {
        	<aggregation_body>
        }
        [, "meta" : { [<meta_data_body>] } ]?
        [, "aggregations" : { [<sub_aggregation>]+ } ]?
    }
    [, "<aggregation_name_2>" : { ... } ]?
}
많이 복잡해 보이지만, 실습으로 익숙해져 보자.
Metric Aggregation
Metric Aggregation은 산술할 때 쓰인다. (최소/최대, 평균 등)
EX> SELECT avg(title) FROM results;
예시로 보도록 하자.

points를 보면 한개는 30, 다른 하나는 20인 것을 확인할 수 있다.
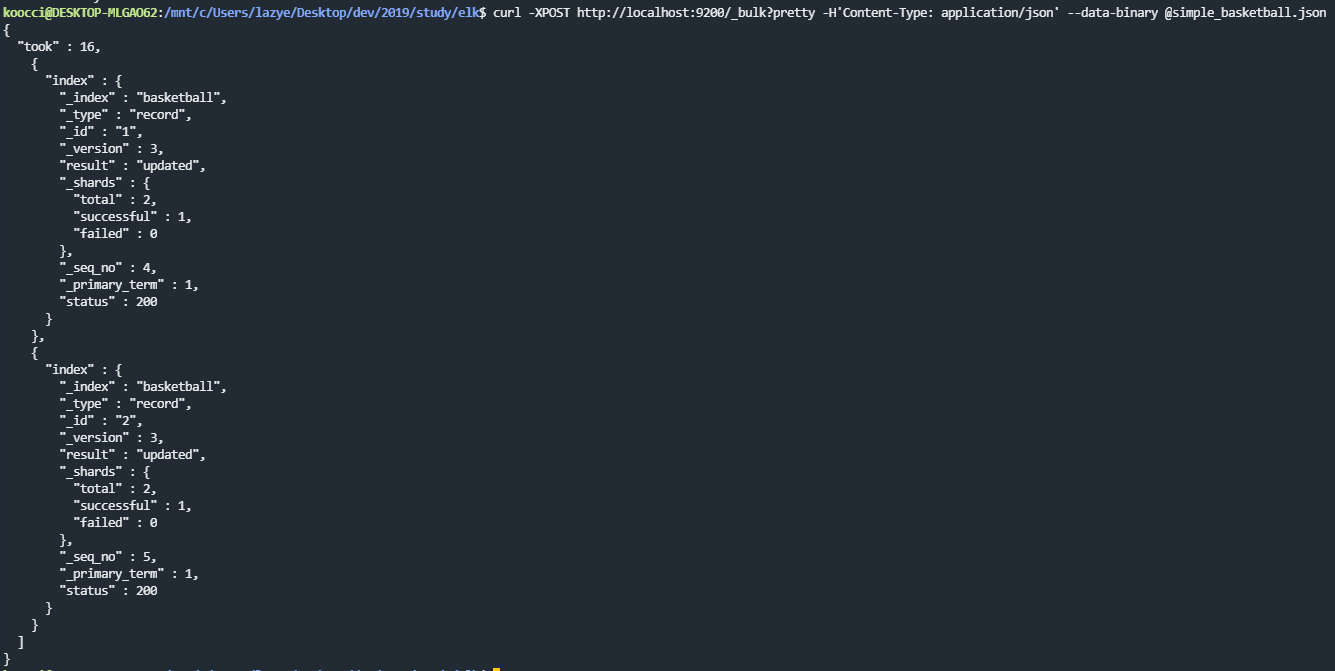
바로 위 Document를 ES에 넣어보자.
curl -XPOST http://localhost:9200/_bulk?pretty -H'Content-Type: application/json' --data-binary @simple_basketball.json{
"took" : 16,
"errors" : false,
"items" : [
{
"index" : {
"_index" : "basketball",
"_type" : "record",
"_id" : "1",
"_version" : 3,
"result" : "updated",
"_shards" : {
"total" : 2,
"successful" : 1,
"failed" : 0
},
"_seq_no" : 4,
"_primary_term" : 1,
"status" : 200
}
},
{
"index" : {
"_index" : "basketball",
"_type" : "record",
"_id" : "2",
"_version" : 3,
"result" : "updated",
"_shards" : {
"total" : 2,
"successful" : 1,
"failed" : 0
},
"_seq_no" : 5,
"_primary_term" : 1,
"status" : 200
}
}
]
}
그러면, aggregation을 하기에 앞서, aggregation 파일을 한번 보도록 하자.
{
	"size" : 0,
	"aggs" : {
		"avg_score" : {
			"avg" : {
				"field" : "points"
			}
		}
	}
}
위 내용을 정리해보면 다음과 같다.
1. 평균을 구하는 aggregation
2. size : 0 > 결과값을 우리가 보고 싶은 값만 보기 위함. (집계만 표시, 검색 적중은 표시하지 않음)
3. aggs > aggregation
4. avg_score > aggregation name
5. avg > 평균을 구함
6. field값의 point의 평균
위 내용을 실행해보자.
curl -XGET http://localhost:9200/_search?pretty -H'Content-Type: application/json' --data-binary @avg_point_aggs.json{
"took" : 31,
"timed_out" : false,
"_shards" : {
"total" : 1,
"successful" : 1,
"skipped" : 0,
"failed" : 0
},
"hits" : {
"total" : {
"value" : 2,
"relation" : "eq"
},
"max_score" : null,
"hits" : [ ]
},
"aggregations" : {
"avg_score" : {
"value" : 25.0
}
}
}위 결과값으로, 25의 평균값이 도출되었다는 것을 알 수 있다.
참고로, size의 숫자를 조절하면, hits 부분에 검색된 결과도 도출된다.
최고값도 노출할 수 있다.
curl -XGET http://localhost:9200/_search?pretty -H'Content-Type: application/json' --data-binary @max_point_aggs.json{
"size" : 0,
"aggs" : {
"avg_score" : {
"max" : {
"field" : "points"
}
}
}
}{
"took" : 4,
"timed_out" : false,
"_shards" : {
"total" : 1,
"successful" : 1,
"skipped" : 0,
"failed" : 0
},
"hits" : {
"total" : {
"value" : 2,
"relation" : "eq"
},
"max_score" : null,
"hits" : [ ]
},
"aggregations" : {
"avg_score" : {
"value" : 30.0
}
}
}
그 이외에도, min, sum도 동일하다.
그렇다면 이 모든 값을 한번에 보고 싶다면 어떻게 하면 될까?
{
	"size" : 0,
	"aggs" : {
		"avg_score" : {
			"stats" : {
				"field" : "points"
			}
		}
	}
}
curl -XGET http://localhost:9200/_search?pretty -H'Content-Type: application/json' --data-binary @stats_point_aggs.json{
"took" : 2,
"timed_out" : false,
"_shards" : {
"total" : 1,
"successful" : 1,
"skipped" : 0,
"failed" : 0
},
"hits" : {
"total" : {
"value" : 2,
"relation" : "eq"
},
"max_score" : null,
"hits" : [ ]
},
"aggregations" : {
"avg_score" : {
"count" : 2,
"min" : 20.0,
"max" : 30.0,
"avg" : 25.0,
"sum" : 50.0
}
}
}위와 같이, stats라는 것을 쓰면 모든 값이 나온다.
그 외에도 다음과 같은 것들이 있다.
1. Extended States 집계 (extended_stats 사용)
제곱 / 분산 / 표준 편차 / 표준 편차 구간
2. Cardinality 집계 (cardinality 사용)
특정 요소의 갯수를 찾음
EX> SELECT COUNT(*) FROM (SELECT distinct username FROM users) u;
EX2> 사용자 클릭 스트림, 특정 날짜 혹은 주/월간 방문자 등에 활용
중복값이 제거된 총 갯수
Bucket Aggregation
앞서, Matric Aggregation은 산술 Aggregation이였다.
Bucket Aggregation은 SQL의 Group By 로 볼 수 있다.
정리하여, Bucket key로 식별되는 여러 Bucket 쿼리 컨텍스트(테이블)에서 정의된 문제의 데이터를 분할하며 Document를 그룹화하는 것이다.
예시를 통해 보도록 하자.
먼저 Aggregation을 하기위한 index를 삽입하자.
curl -XPUT localhost:9200/basketball{"acknowledged":true,"shards_acknowledged":true,"index":"basketball"}
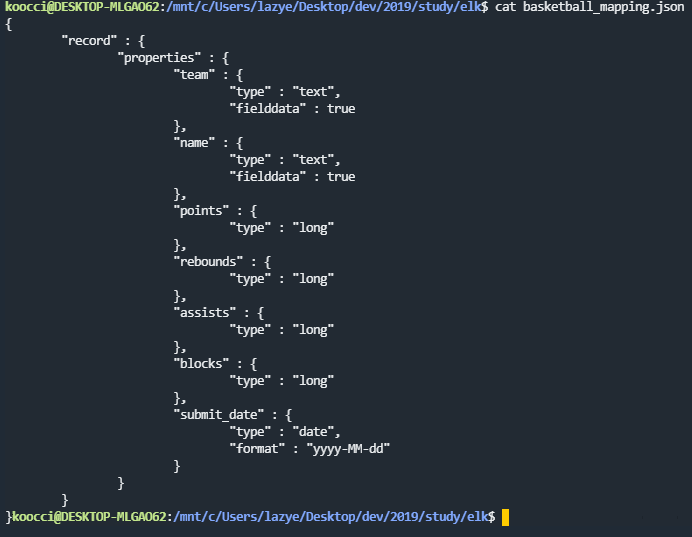
다음으로는 index 안에 mapping을 넣을 것이다.
{
	"record" : {
		"properties" : {
			"team" : {
				"type" : "text",
				"fielddata" : true
			},
			"name" : {
				"type" : "text",
				"fielddata" : true
			},
			"points" : {
				"type" : "long"
			},
			"rebounds" : {
				"type" : "long"
			},
			"assists" : {
				"type" : "long"
			},
			"blocks" : {
				"type" : "long"
			},
			"submit_date" : {
				"type" : "date",
				"format" : "yyyy-MM-dd"
			}
		}
	}
}
1. record라는 타입 안에 properties를 넣음.
2. type은 long, date, text가 존재
3. fielddata는 true로 설정하여, Terms Aggregation 시에 조회할 수 있도록 설정
문자열 데이터 Bucketing을 할 때, ES에서 키워드 타입 필드를 기반으로 데이터 또는 세그먼트를 버킷에 보관할 수 있다.
그 중 가장 일반적인 방법이 Terms Aggregation이다.
그럼 mapping을 적용하자.
curl -XPUT 'localhost:9200/basketball/record/_mapping?include_type_name=true&pretty' -H'Content-Type: application/json' -d @basketball_mapping.json{
"acknowledged" : true
}그럼 이제 document를 삽입해보자.
{ "index" : { "_index" : "basketball", "_type" : "record", "_id" : "1"}}
{"team" : "Chicago","name" : "Michael Jordan", "points" : 30,"rebounds" : 3,"assists" : 4, "blocks" : 3, "submit_date" : "1996-10-11"}
{ "index" : { "_index" : "basketball", "_type" : "record", "_id" : "2"}}
{"team" : "Chicago","name" : "Michael Jordan","points" : 20,"rebounds" : 5,"assists" : 8, "blocks" : 4, "submit_date" : "1996-10-13"}
{ "index" : { "_index" : "basketball", "_type" : "record", "_id" : "3"}}
{"team" : "LA","name" : "Kobe Bryant","points" : 30,"rebounds" : 2,"assists" : 8, "blocks" : 5, "submit_date" : "2014-10-13"}
{ "index" : { "_index" : "basketball", "_type" : "record", "_id" : "4"}}
{"team" : "LA","name" : "Kobe Bryant","points" : 40,"rebounds" : 4,"assists" : 8, "blocks" : 6, "submit_date" : "2014-11-13"}

위 4개의 document를 사용할 것이다.
그럼 삽입은 다음과 같다.
curl -XPOST http://localhost:9200/_bulk?pretty -H'Content-Type: application/json' --data-binary @twoteam_basketball.json{
"took" : 17,
"errors" : false,
"items" : [
{
"index" : {
"_index" : "basketball",
"_type" : "record",
"_id" : "1",
"_version" : 1,
"result" : "created",
"_shards" : {
"total" : 2,
"successful" : 1,
"failed" : 0
},
"_seq_no" : 1,
"_primary_term" : 1,
"status" : 201
}
},
{
"index" : {
"_index" : "basketball",
"_type" : "record",
"_id" : "2",
"_version" : 1,
"result" : "created",
"_shards" : {
"total" : 2,
"successful" : 1,
"failed" : 0
},
"_seq_no" : 2,
"_primary_term" : 1,
"status" : 201
}
},
{
"index" : {
"_index" : "basketball",
"_type" : "record",
"_id" : "3",
"_version" : 1,
"result" : "created",
"_shards" : {
"total" : 2,
"successful" : 1,
"failed" : 0
},
"_seq_no" : 3,
"_primary_term" : 1,
"status" : 201
}
},
{
"index" : {
"_index" : "basketball",
"_type" : "record",
"_id" : "4",
"_version" : 1,
"result" : "created",
"_shards" : {
"total" : 2,
"successful" : 1,
"failed" : 0
},
"_seq_no" : 4,
"_primary_term" : 1,
"status" : 201
}
}
]
}그럼 이제 aggregation을 보도록 하자.
{
	"size" : 0,
	"aggs" : {
		"players" : {
			"terms" : {
				"field" : "team"
			}
		}
	}
}
위 예시가 Terms Aggregation이다.
위 내용을 돌려보자.
curl -XGET http://localhost:9200/_search?pretty -H'Content-Type: application/json' --data-binary @terms_aggs.json{
"took" : 840,
"timed_out" : false,
"_shards" : {
"total" : 1,
"successful" : 1,
"skipped" : 0,
"failed" : 0
},
"hits" : {
"total" : {
"value" : 5,
"relation" : "eq"
},
"max_score" : null,
"hits" : [ ]
},
"aggregations" : {
"players" : {
"doc_count_error_upper_bound" : 0,
"sum_other_doc_count" : 0,
"buckets" : [
{
"key" : "chicago",
"doc_count" : 2
},
{
"key" : "la",
"doc_count" : 2
}
]
}
}
}위 결과로, chicago document가 2개가 있고, la document가 2개 있다는 것을 볼 수 있다.
그럼 팀별 분류는 되었는데, 어떻게 분석을 진행할 수 있는지 보자.
예를 들어, 팀 분류 후, 각 팀 별 성적을 보는 게 최종 목적일 수 있다.
위 예시를 진행해 보자.
{
	"size" : 0,
	"aggs" : {
		"team_stats" : {
			"terms" : {
				"field" : "team"
			},
			"aggs" : {
				"stats_score" : {
					"stats" : {
						"field" : "points"
					}
				}
			}
		}
	}
}
이번에는 sub aggregation이 들어간 것을 볼 수 있으며, bucket aggregation은 sub aggregation을 포함할 수 있다.
즉, 위는 team_stats라는 이름으로 팀별로 묶어 두고, stats_score라는 sub aggregation을 통해 Matric Aggregation을 사용하여 각 팀별 통계 분석을 하는 것이다.
curl -XGET http://localhost:9200/_search?pretty -H'Content-Type: application/json' --data-binary @stats_by_team.json{
"took" : 7,
"timed_out" : false,
"_shards" : {
"total" : 1,
"successful" : 1,
"skipped" : 0,
"failed" : 0
},
"hits" : {
"total" : {
"value" : 5,
"relation" : "eq"
},
"max_score" : null,
"hits" : [ ]
},
"aggregations" : {
"team_stats" : {
"doc_count_error_upper_bound" : 0,
"sum_other_doc_count" : 0,
"buckets" : [
{
"key" : "chicago",
"doc_count" : 2,
"stats_score" : {
"count" : 2,
"min" : 20.0,
"max" : 30.0,
"avg" : 25.0,
"sum" : 50.0
}
},
{
"key" : "la",
"doc_count" : 2,
"stats_score" : {
"count" : 2,
"min" : 30.0,
"max" : 40.0,
"avg" : 35.0,
"sum" : 70.0
}
}
]
}
}
}그 결과, 각 팀별(chicago, la) 최대, 최소, 평균, 종합 값이 나오는 것을 볼 수 있다.
그 외에도 다양한 기능이 있으니 아래 참고 사이트를 참고하면 좋다.
[참고 : https://kazaana2009.tistory.com/7]
※ Inflearn 강의, Naver D2 블로그 등을 참고해 정리한 내용입니다.
1편 > Elastic Stack 아주 조금만 알아보자 - Elastic Stack 이란?
2편 > Elastic Stack 아주 조금만 알아보자 - ElasticSearch 기본 실습
3편 > Elastic Stack 아주 조금만 알아보자 - ElasticSearch Mapping/Search
4편 > Elastic Stack 아주 조금만 알아보자 - ElasticSearch 구조
5편 > 현재 Post
6편 > Elastic Stack 아주 조금만 알아보자 - Kibana
'Architecture > ELK' 카테고리의 다른 글
| Elastic Stack 아주 조금만 알아보자 - LogStash (0) | 2019.12.12 |
|---|---|
| Elastic Stack 아주 조금만 알아보자 - Kibana (0) | 2019.12.05 |
| Elastic Stack 아주 조금만 알아보자 - ElasticSearch 구조 (0) | 2019.11.28 |
| Elastic Stack 아주 조금만 알아보자 - ElasticSearch Mapping/Search (0) | 2019.11.27 |
| Elastic Stack 아주 조금만 알아보자 - ElasticSearch 기본 실습 (0) | 2019.11.20 |